Best Practices for Image to 3D Model: Optimizing Image Inputs for AI 3D Model Generators (Meshy, Trellis, Hunyuan, Tripo, Rodin)
From our previous comparison, we know that the quality gap between leading generative 3D model tools (Tripo, Meshy, Rodin for closed source or Trellis and Hunyuan for open source) isn't as large as you might think. The real difference between getting great results versus suboptimal ones often comes down to the quality of your input images.
Garbage in, garbage out—your input images directly impact your generated 3D model quality and texture quality. The most crucial step is leveraging AI image generator tools to create the best quality input images possible.
Let's walk through some best practices for generating input images that will help you get superior results from any AI image to 3D model generator.
Tip 1: Optimize Image to 3D Model Inputs by Avoiding Effects and Harsh Lighting
Depending on the AI model you're using, craft your prompts (or use negative prompts) to make your concept image look as much like a clean 3D game asset as possible. Ensure there are no special effects, no harsh lighting, and use flat, even colors.
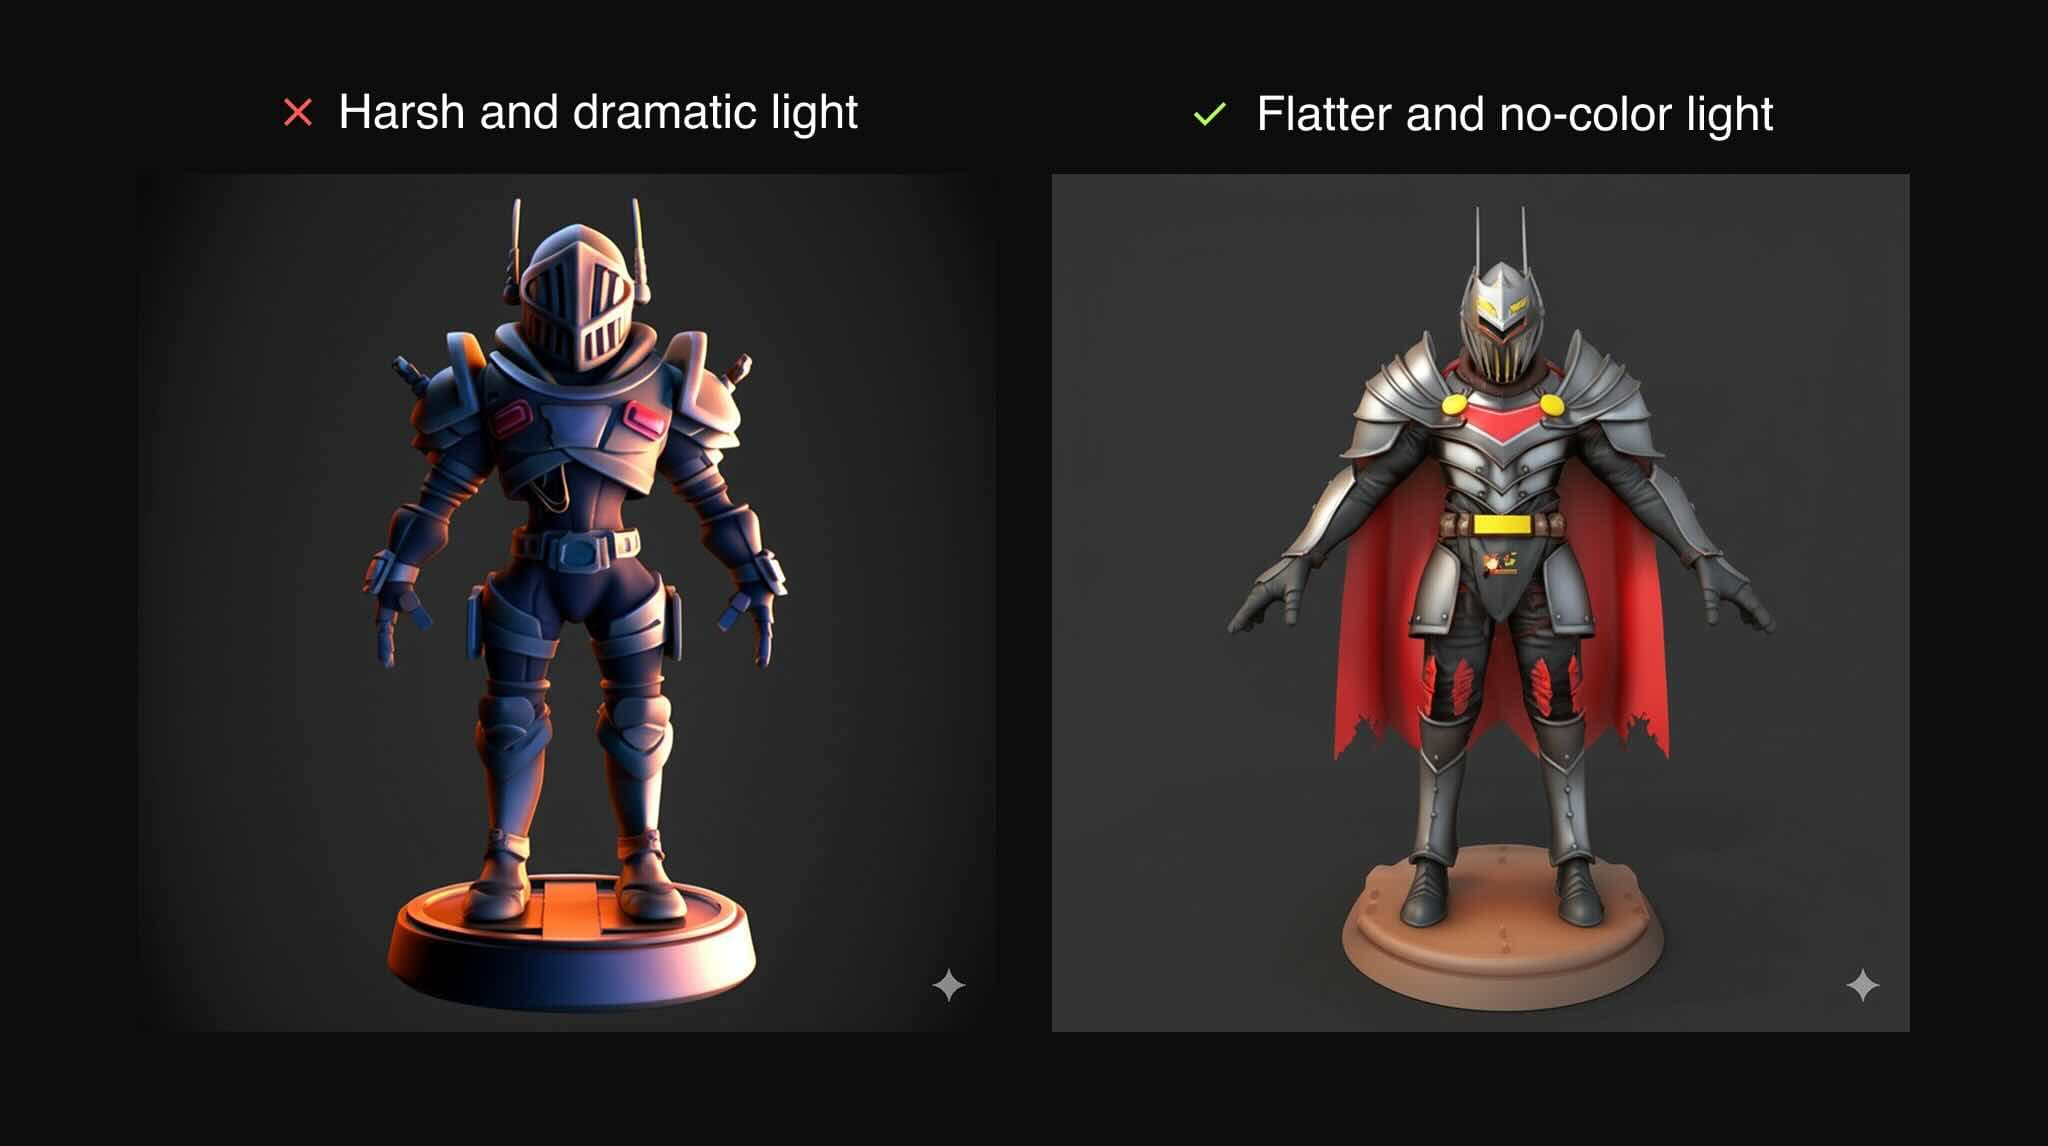
Any effects you include will result in weird mesh information, while harsh lighting will make your texture lose details in shadow areas. Hard lighting makes it more difficult for AI to determine mesh details in overexposed or underexposed areas. Aim for even, diffused lighting that reveals all surfaces clearly.
Tip 2: Create Better Image to 3D Models with Coherent Multiple Views
Most models like Trellis and Hunyuan accept multiple images as input. You should provide front, back, and side views for the best results. Start by generating a high-quality front view of your model first.
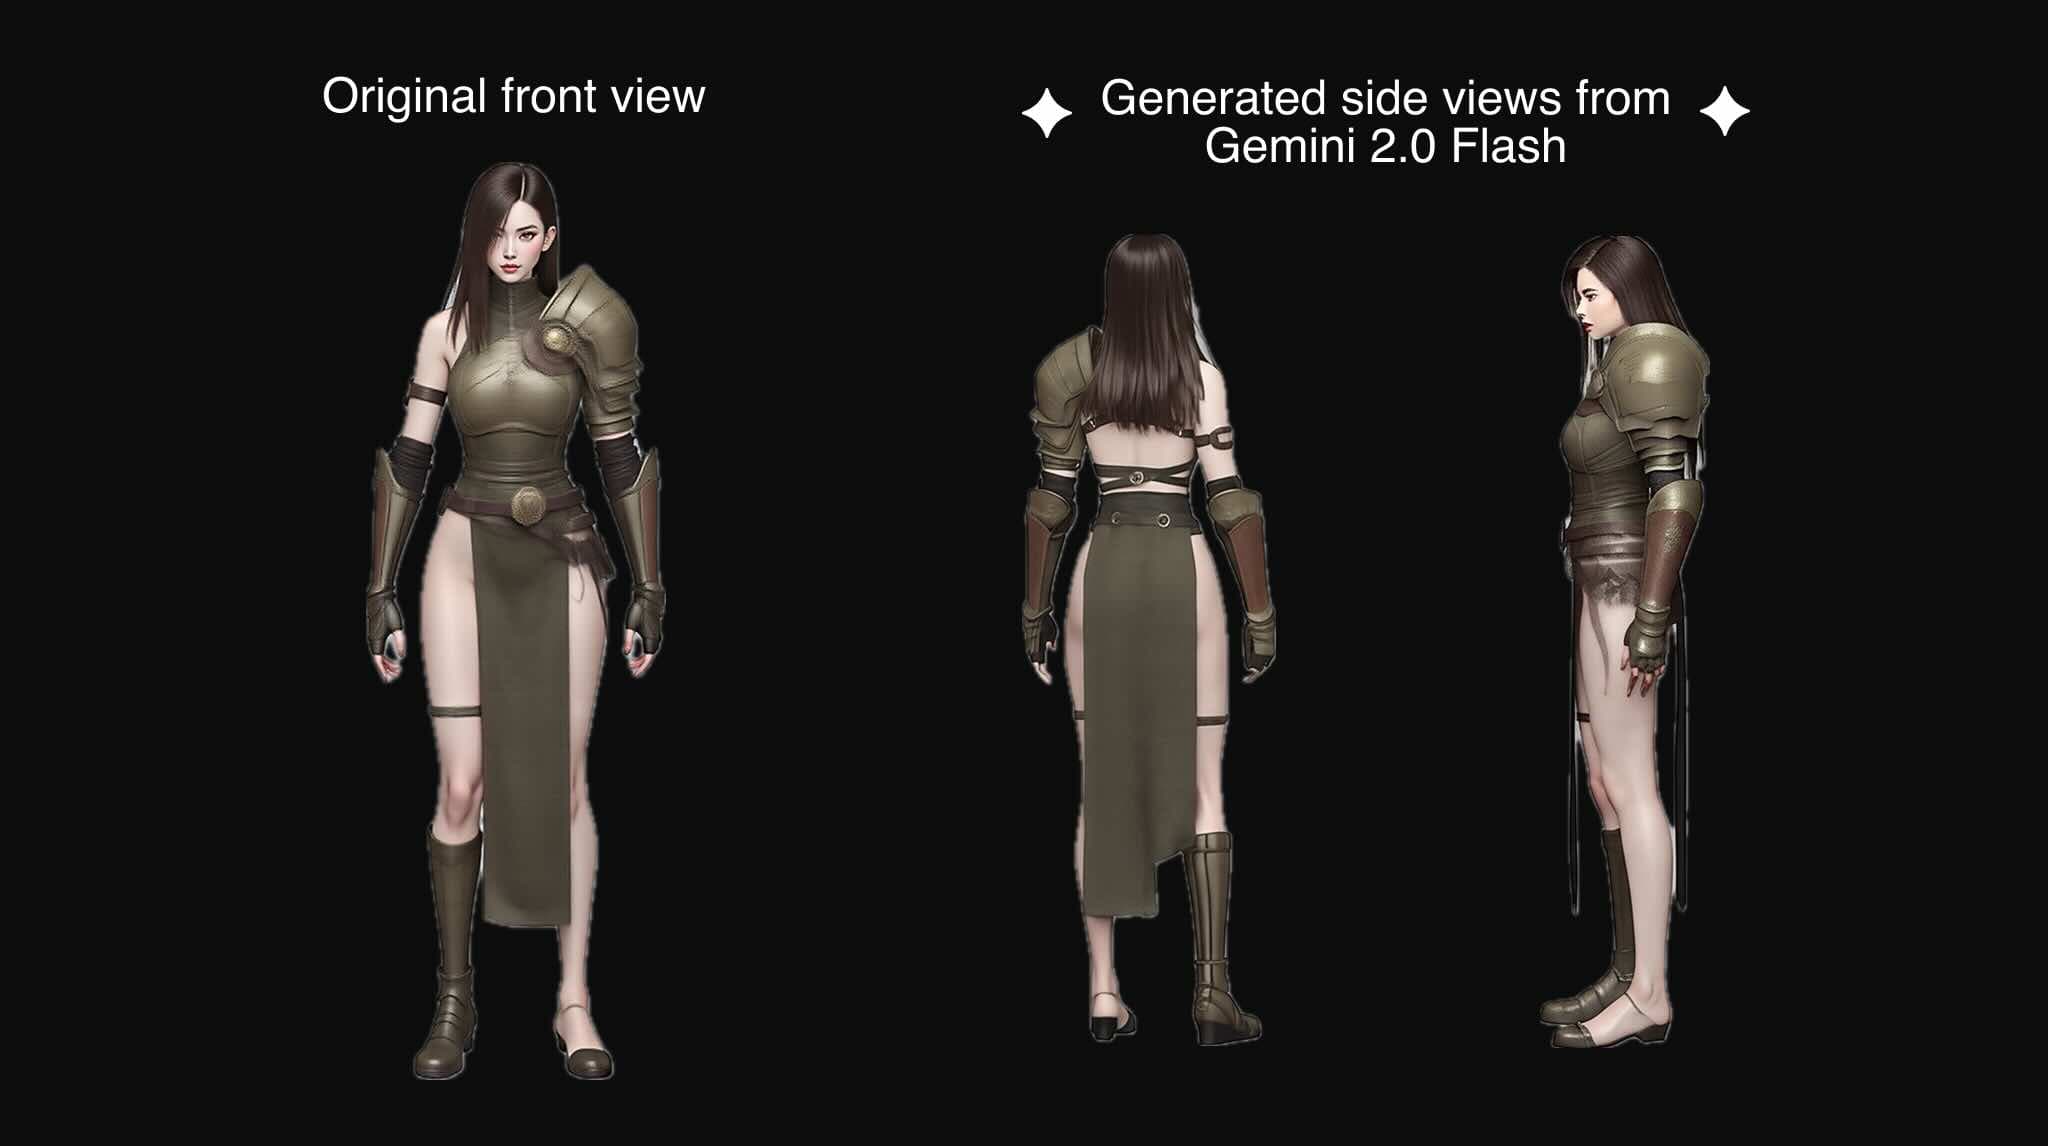
For photorealism, tools like Flux AI work well. For more stylized concepts, Stable Diffusion or Midjourney might be better choices. Once you have a solid front view, bring that image into Google Studio and use Gemini 2.0 Flash Image Gen. Ask Gemini to "Generate the back view," "Generate left side view," and "Generate right side view" based on your front image.
A crucial point to remember: make sure all views are coherent and don't contradict each other. For example, if a character is wearing a gauntlet on the right hand in the front view, ensure the left side view doesn't show a gauntlet on that hand, and verify the back view correctly shows the gauntlet on the right hand.
Having consistent views is so important that it's better to provide a single good image than multiple conflicting views. Contradictory inputs will confuse the generative 3D models and yield subpar results. Work with Gemini or ChatGPT 4o until all four sides are high-quality and consistent with each other.
Tip 3: Improve Image to 3D Model Quality Using T-pose for Characters
Generative 3D models are typically trained on high-quality datasets where character models are prepared in a T-pose—the industry standard. If you provide a character concept in T-pose, you'll achieve better results, especially in the hands area. This is particularly noticeable with the Trellis model, as noted in our previous comparison.
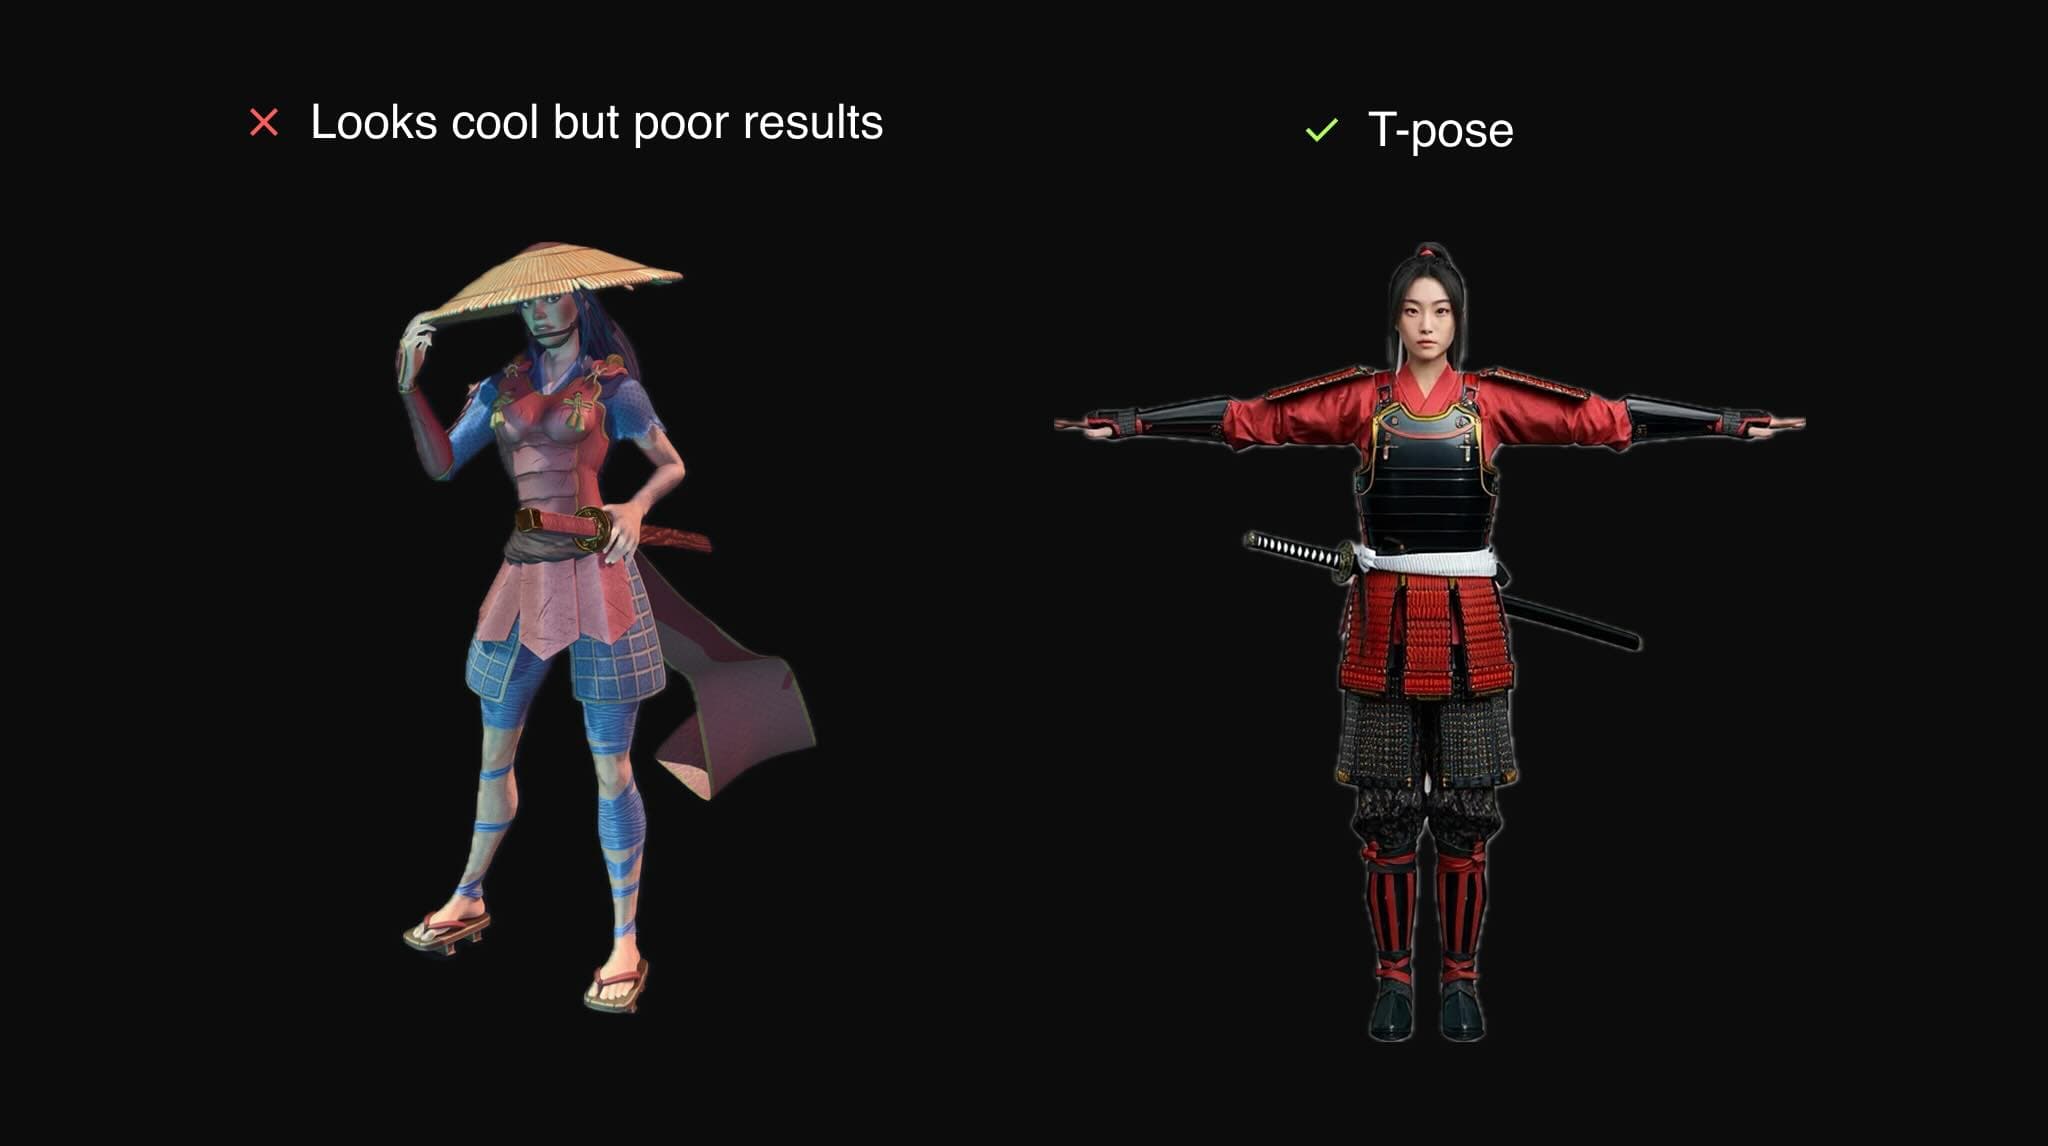
The T-pose also helps reveal all necessary concept details, ensuring that hand or arm placement doesn't obscure any parts of the character. Another benefit of using T-pose is that you can easily rig the resulting model with tools like Mixamo's auto-rigger for animation purposes.
Tip 4: Segment Complex Concepts for Better Image to 3D Model Results
This tip builds on the goal of revealing as many details of your concept as possible without having parts covering each other. For example, if you have a character carrying a huge sword on their back, it's better to separate the sword from the character in your input images and generate them as separate models.
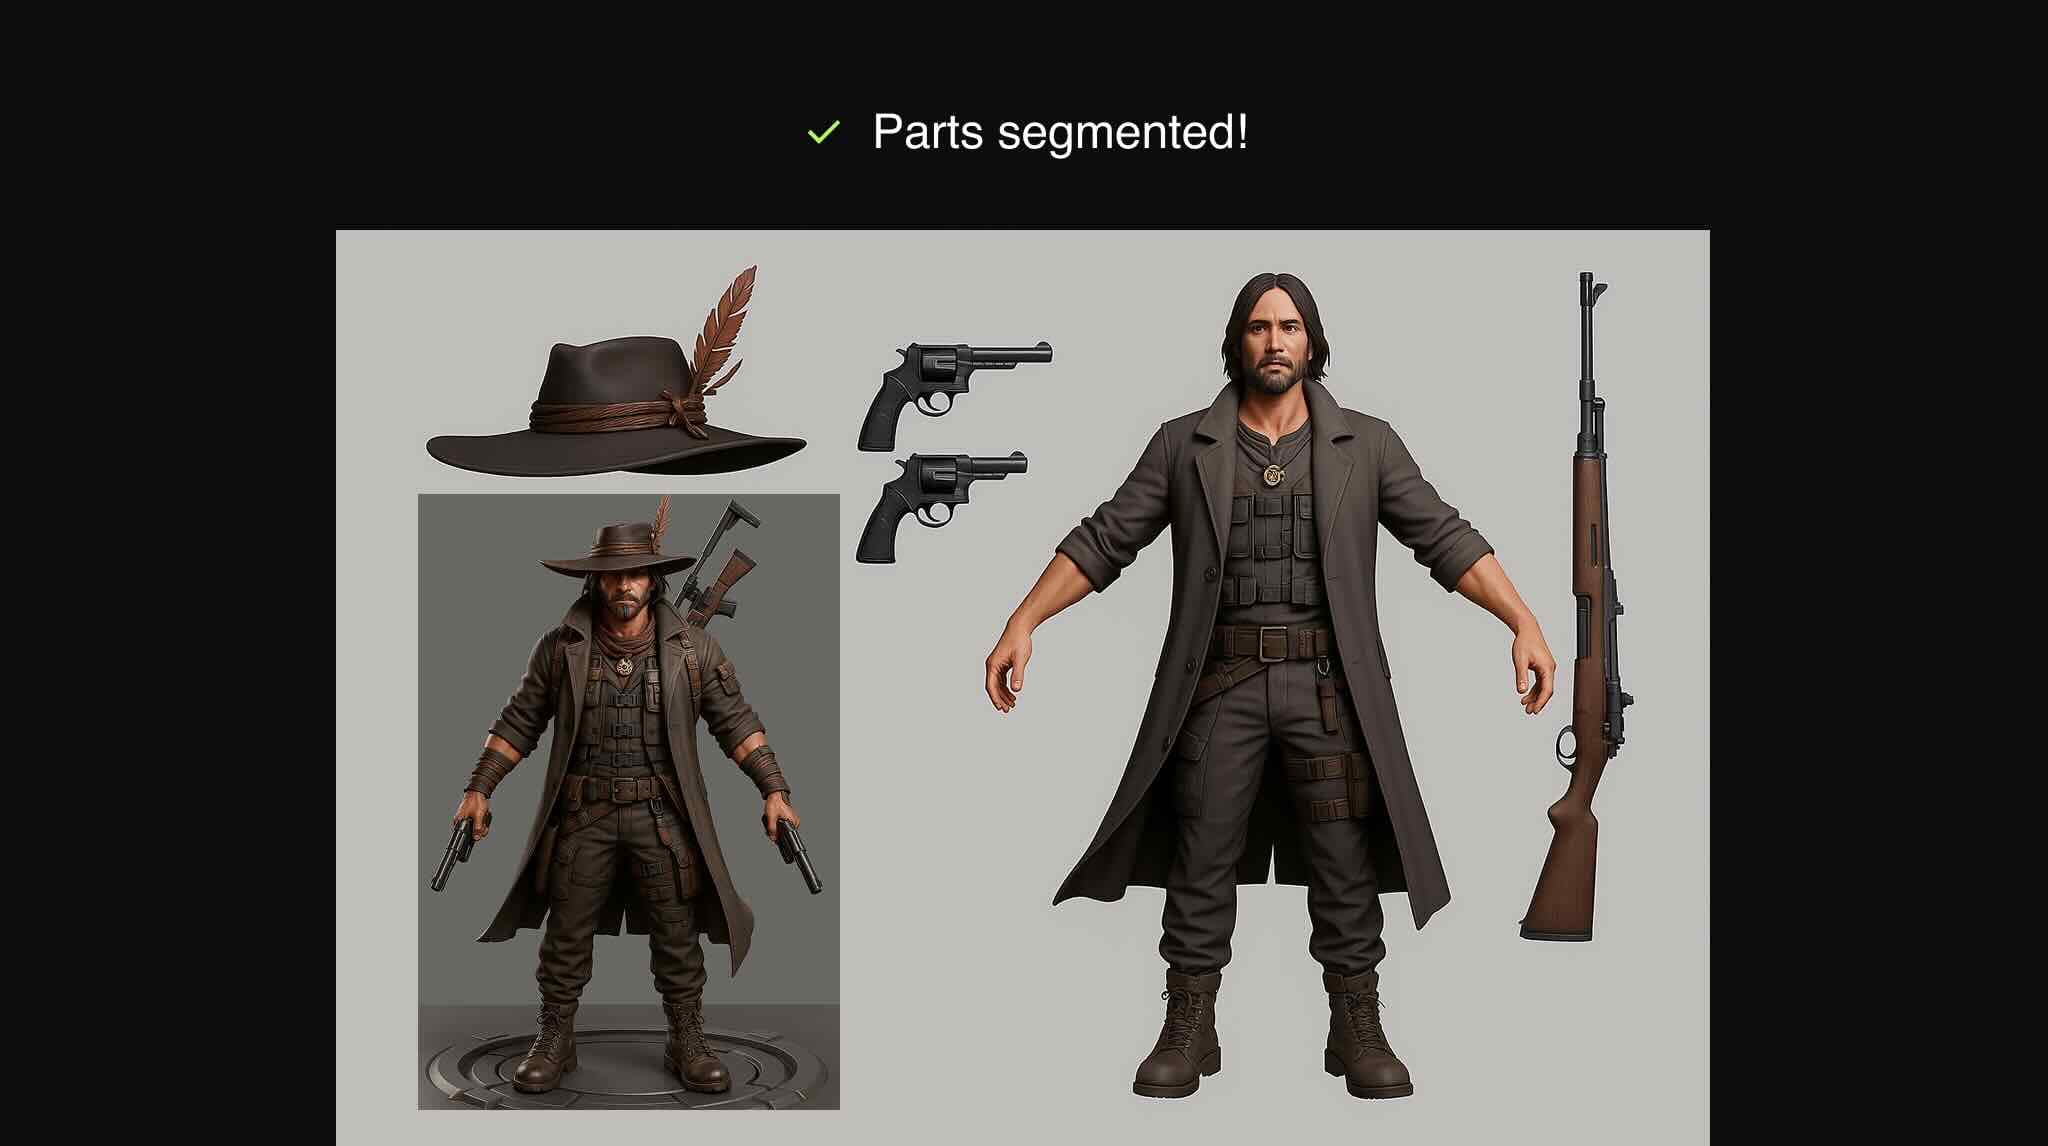
This approach ensures each model gets maximum texture quality and prevents the sword from covering character details. For games and animations, you'll likely want the character to wield the sword anyway, so having them as separate assets makes practical sense.
To maximize quality, you can segment outfits, accessories, and even hair from the character. This gives you the highest quality for each component, which you can then compose in your 3D software of choice.
Beyond characters, when working on a scene with multiple props, it's best to develop a scene concept first and then use that as a base to generate individual props separately. Never generate a scene as one mesh—the quality will suffer significantly.
The bottom line: spend time breaking up your concept into smaller units, then generate input images and 3D models separately. Tools like Gemini 2.0 image generation and ChatGPT 4o can help you segment and generate multiple views for each component through simple text prompts.
Tip 5: Image to 3D Model Technique: Start With a Sculpture for Photorealistic Characters
When aiming for photorealistic character models, a two-stage approach often yields the best results. First, create your character as a sculpture or statue to get the best possible mesh quality. Then generate texture details in a second pass.
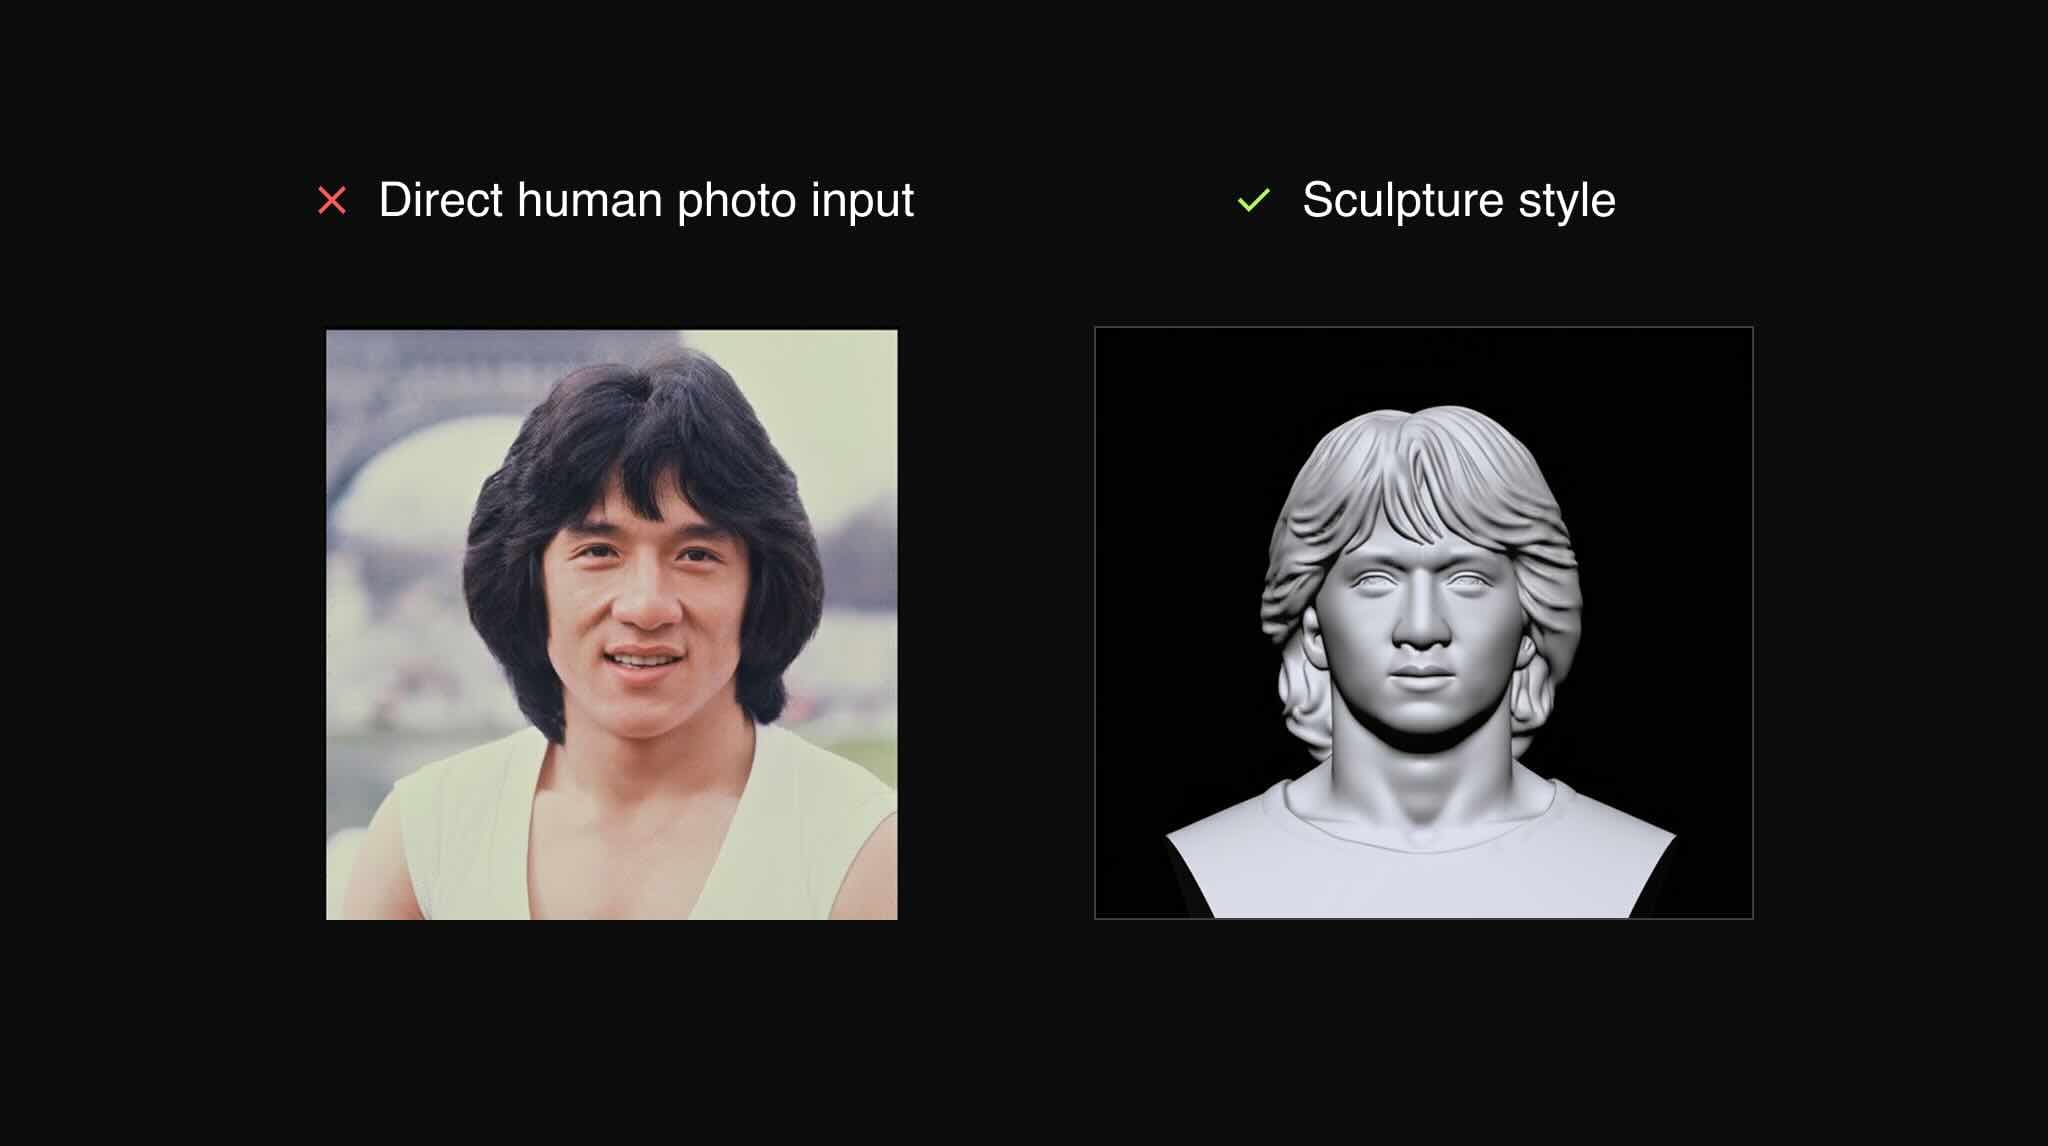
This approach helps the AI focus on generating accurate geometry in the first stage without being distracted by complex textures. In the second stage, you can focus entirely on getting the right skin tones, materials, and surface details while working with an already solid mesh.
Tip 6: Clean Backgrounds for Better Image to 3D Model Conversion
Most generative 3D models perform a background removal step before processing your image. If your input has a busy or distracting background, this segmentation process can result in low-quality isolation of your model.
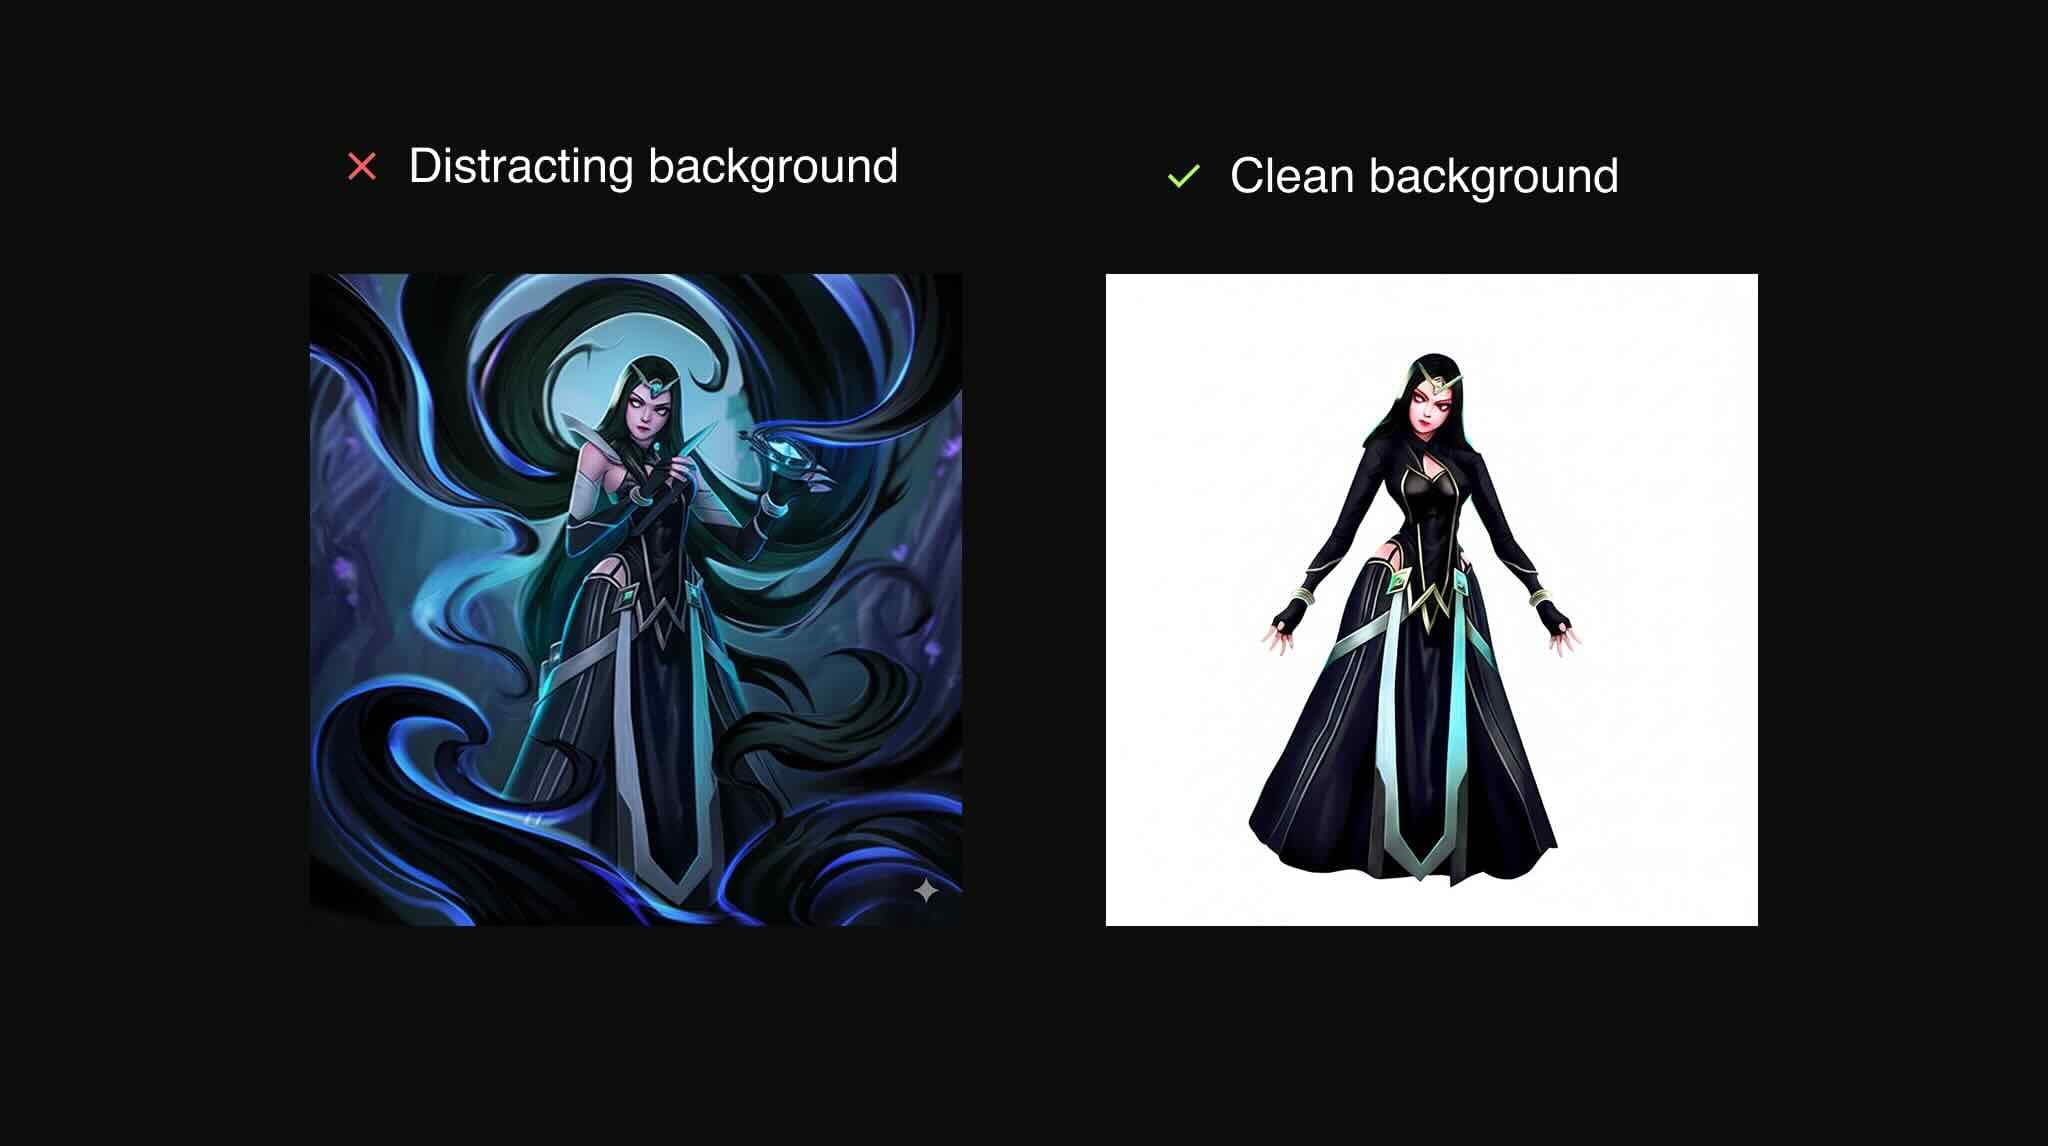
Whenever possible, use input images with clean, neutral backgrounds. If you're using AI image generators, include terms like "neutral background," "solid background," or "studio lighting" in your prompts. For existing images, consider using background removal tools before submitting them to 3D generators.
Clear silhouettes help AI models understand exactly what object they should be converting to 3D, leading to more accurate geometry and better overall results.
Tip 7: Refine Your Image to 3D Model Results
Generated 3D models provide an excellent starting point, but don't settle for the initial output. Use specialized tools like ideate.xyz to further edit textures or adjust the mesh before incorporating assets into your production pipeline.
After generating your model, consider these refinement steps:
- Use Ideate's texture painting tools to enhance surface details
- Clean up topology in your preferred 3D modeling software
- Adjust UV maps if necessary for better texture resolution distribution
- Create specialized maps (normal, roughness, metallic) for PBR workflows
Remember that AI-generated models are meant to be a strong foundation, not necessarily the final product. The best results come from combining AI efficiency with human artistic refinement.
Ready to Perfect Your Image to 3D Model Textures?
Generate your 3D models with these best practices, then use Ideate to perfect their textures and bring them to life.
Start for FreeRelated Articles
AI 3D Model Comparison: Trellis vs Tripo vs Meshy vs Rodin vs Hunyuan
Comprehensive comparison of the top 5 AI 3D model generators: Trellis, Tripo, Meshy, Rodin, and Hunyuan. Learn their strengths, weaknesses, and which is best for your specific use case.
Apr 12, 2025How to Refine Textures on AI-Generated 3D Models from Meshy, Rodin, Tripo, Trellis, and Hunyuan
Learn effective techniques to improve textures on 3D models generated by Meshy, Rodin, Tripo, Trellis, and Hunyuan.
Mar 25, 2025